|
<< Click to Display Table of Contents >> Attributes |
  
|
|
<< Click to Display Table of Contents >> Attributes |
|
A Ventity™ attribute is a property or characteristic of an entity. Like variables, each attribute of an entity type has a name (e.g. "hair color") and a value (e.g. "brown"). Unlike variables, whose values are numbers, the value of an attribute is a string -- any combination of letters, numbers, or other characters.
Some examples of attributes:
For entities of type... |
a useful attribute might be... |
whose value might be one of ... |
Bear, or Film Actor |
hair color |
"brown", "blond", "grey", "red" |
Insect |
current lifecycle stage |
"egg", "larva", "pupa", "adult" |
Restaurant |
name |
"Herb's Hideaway", "Flask and Forge", "The Corner Dive" |
Agent |
AgentID |
... "Agent_005", "Agent_006", "Agent_007", ... |
Customer |
favorite restaurant |
"Herb's Hideaway", "Flask and Forge", "The Corner Dive" |
Attributes are used in four ways in Ventity.
•Attributes are used as keys, to uniquely identify each entity in the model.
•Attributes can track discrete values of status that can be used in equations to decide behavior.
•Attributes can be used to name relationships to other entities.
•Attributes can be used to categorize entities into collections, in order to measure aggregate statistics.
You may make a new attribute in your entity type definition by dragging the attribute icon from the palette onto a diagram, by right-clicking an empty spot on a diagram and choosing "new attribute", or by clicking the "add attribute" button in the lower left of the attribute tab of the inspector for your entity type. You will be prompted to provide a name for the attribute. Usually, the name describes the attribute generally: "hair color", "best friend", "hometown". The figure below shows an attribute called "pasture".
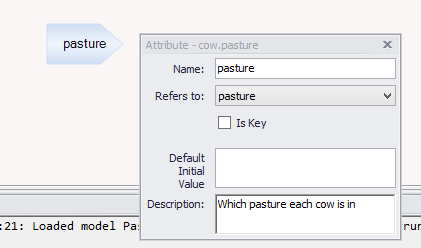
When you edit an attribute (by right-clicking and choosing "Edit"), you will be asked for four additional things:
If the attribute describes a relationship to another specific entity, the "refers to" dropdown menu is used to select what type the other entity is. For example: an entity of type "car" might have an attribute called "owner", which refers to an entity of type "person". If your attribute describes such a relationship, choose the type of the other entity from the list. If it does not, choose "<none>".
Why and how to use this aspect of attributes is discussed fully in the references section below.
Every entity (except singular entities) must have a unique key to identify it. You don't have to worry about keys until you choose to, because by default, Ventity automatically creates a suitable key for each entity in your model. So come back to this section whenever you wish.
A key is a unique attribute value, or a unique combination of attribute values. The attribute "name" might be a suitable key for restaurant entities, so long as no two restaurants in the model have the same name. The Vehicle Identification Number (VIN) is a great key for cars, because each car has its own unique VIN. It is also possible to use combinations of attributes as a compound key. For example, intersection entities in a simulation of city traffic patterns can be uniquely identified by the names of their two intersecting streets.
When you create a new entity type, Ventity automatically creates an attribute for that entity to use as a key. This attribute has the same name as the entity type with ID appended, so your Rabbit entity type comes ready-made with an attribute called rabbitID. Each rabbit will have a unique value for its rabbitID. The first rabbit entity to appear in the model will have a rabbitID value of "The rabbit". If new rabbits are created, their rabbitID's will be rabbit-1, rabbit-2, rabbit-3 and so on. (Setting number of entities and their initial attribute values in the model is covered below in the initialization section. Adding entities during the simulation is done using actions, also covered below.) You will see that the Refers To: field is set to type "rabbit", because since the rabbitID attribute for any given rabbit refers to that rabbit itself, the rabbit ID attribute does in fact refer to an entity of type "rabbit".
If you wish to use your own key attribute(s) or values instead,
Pick a single attribute to use as a key. Check the Key box for that attribute, and make sure no other attributes of that entity type have Key checked.
oIf you set the Refers To: dropdown to the entity type itself, Ventity will auto-generate values in the manner described above.
oIf you set Refers To: to <none> or to any other entity type, you will need to provide a value for the attribute via the Default Initial Value field, or during initialization, or using actions.
To use a compound key, check the Key box for more than one attribute.
oReturning to the intersection example, the intersection entity type might have a "north-south street" attribute and a "east-west street" attribute. If you check both, then the names of the two intersecting streets will be the key, uniquely identifying each intersection.
oVentity will not automatically create compound keys. If you select more than one Key attribute, you will need to ensure that each intersection has a unique combination of streets, and that any new intersections created by the model (using actions) have their key attributes correctly and uniquely valued.
oA maximum of four attributes may be designated as keys.
For a complete example of using compound keys, see the many-to-many relationship pattern.
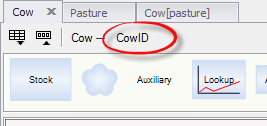
The key attribute(s) for an entity type are listed at the top of each diagram for that entity type. In the figure below, the CowID attribute is the key attribute for the Cow entity type:
Once simulation has started, the value of an attribute can only be changed by an action. The starting value of the attribute is set during initialization. However, if no value is provided during initialization, Ventity determines the initial value from what you enter in the Default Initial Value field.
oThis can be a string, in quotation marks. For example, every new insect entity starts off with current lifecycle stage of "egg".
oOr, it can be an expression, for example, if (random()<0.5) {"blonde"} else {"brown"}.
Use the description field for an optional comment or explanation of the attribute.
Attributes of a given entity type can be seen in three places:
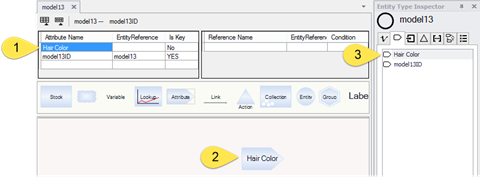
1.The attribute grid at the top of each diagram lists all attributes of the entity, as well as what type they refer to, and whether they are marked as key attributes.
2.Attributes can be included in diagrams.
3.The entity type inspector attributes tab lists all attributes.
Double-click on any of these to edit (or review) the details of a particular attribute.
•Attributes are used as keys, to uniquely identify each entity in the model, as described above.
•Attributes can track discrete values of status (as opposed to continuous values, for which you'd use stocks), that can be used in equations whose output depends on conditions. For example, fun = if ("hair color"=="blonde") {2} else {1}.
If an attribute is empty, the attribute will be given the value "" (a string of length 0). This can be used to test whether a value has been assigned:
hair status = if (hair color=="") {"bald"} else {"not bald"}.
•Attributes can be used to name relationships to other entities. Information about those related entities can then be used via references.
•Attributes can be changed during the course of a simulation using actions.
•Attributes can be used to categorize entities into collections, in order to measure aggregate statistics.
References, actions and collections are the subjects of the next three sections.
For an example in the creation and use of attributes, see the exercise example [here].
Mapping attributes are a specific kind of attribute which can be created upon creating a new subcollection. These attributes are useful for tracking and using information between attributes.
To create a Mapping Attribute, create a new subcollection. You'll be prompted with a new screen where you'll select the key(s) of the subcollection, and beneath that will be the tab where mapping attributes will appear once added.
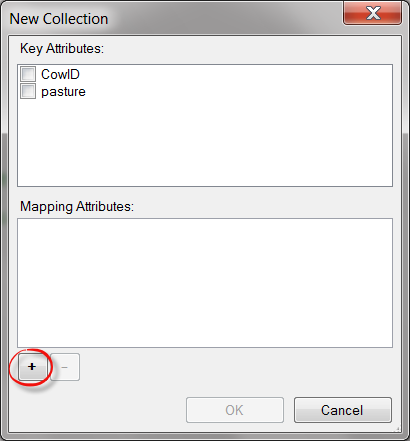
Click on the ![]() to add a new Mapping Attribute. It will appear under the Mapping Attributes tab with a generic name (Attribute1, Attribute2, etc..), this name can be changed by double-clicking the attribute on this screen, or can be altered later. Once you have as many Mapping Attributes as you'll require, click "Ok".
to add a new Mapping Attribute. It will appear under the Mapping Attributes tab with a generic name (Attribute1, Attribute2, etc..), this name can be changed by double-clicking the attribute on this screen, or can be altered later. Once you have as many Mapping Attributes as you'll require, click "Ok".
A new subcollection will be created with its keys and Mapping Attributes listed in brackets. Now, to set the actual mapping for these attributes, go to the attributes tab of the Entity Inspector and double-click on the attribute that was just created. Note that the link that's being created is not between subcollections but between the underlying attributes and their entities, so the mapping only takes place between the attributes included in the mapping.
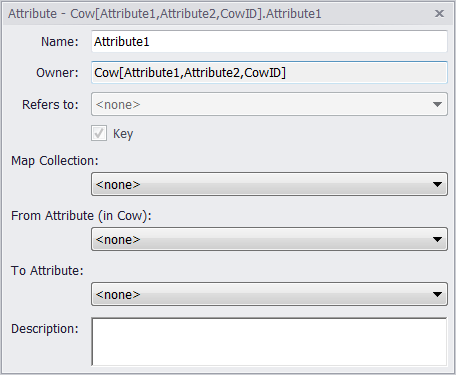
Now, set the Map Collection -- this will be to the entity or collection that contains the attribute that you'll be mapping to. Next, select the From and To Attributes, these attributes will be linked, and the subcollection can be used to track and aggregate information from both.